0004 - My Cisco Cheatsheet
Most of the time when I learn new stuff, I need to write it down. That way my brain doesn’t forget as fast.
This is just my own personal Cisco cheatsheet. Don’t know if every description of a command is correct. Might change over time as I add, edit or delete sections… It’s not done yet, don’t know if it will ever be truly finished…
#   _____  _                   _     _____  _                  _
#  / ____|| |                 | |   / ____|| |                | |
# | |     | |__    ___   __ _ | |_ | (___  | |__    ___   ___ | |_
# | |     | '_ \  / _ \ / _` || __| \___ \ | '_ \  / _ \ / _ \| __|
# | |____ | | | ||  __/| (_| || |_  ____) || | | ||  __/|  __/| |_
#  \_____||_| |_| \___| \__,_| \__||_____/ |_| |_| \___| \___| \__|
#                                                                  1.0
# .:|:.:|:.
#   Cisco   & Podepod
Cisco Catalyst Switches
Analyse
Terminal Paging
term[inal] l[ength] 0           ! Disables terminal paging
term[inal] l[ength] 20          ! Sets the terminal paging to 20 lines
Enable and disable live logs in the terminal (Terminal monitorring)
terminal monitor                 ! Enable
terminal no monitor              ! Disable
Filter command output
sh[ow] mac address-table | i[nclude] Gi1/0/2 		! Only include the lines that have 'Gi1/0/2' on it
sh[ow] mac address-table | i[nclude] Gi1/0/[2-6]    ! Only include the lines that include Gi1/0/2 to Gi1/0/6
sh[ow] mac address-table | b[egin] Gi1/0/2 			! Start at the first line that has 'Gi1/0/2' on it and show every line after that
sh[ow] mac address-table | e[xclude] Gi1/0/2		! Show all output except the lines that have 'Gi1/0/2' on it
sh[ow] mac address-table | c[ount] Gi1/0/2 			! Count the amount of lines that have 'Gi1/0/2' on it
sh[ow] running-config | s[ection] aaa               ! Only show the AAA section of the running-config
Interface Counters
sh[ow] int[erface] counters                         ! Show all interface counters
sh[ow] int[erface] counters | i Gi1/0/2             ! Show interface counters for Gi1/0/2
clear counters                                      ! Clear all interface counters
clear counters int Gi1/0/2                          ! Clear interface counters for Gi1/0/2
Interface configuration
sh[ow] run[ning-config] int[erface] Gi1/0/2         ! Show the current running configuration of that interface
sh[ow] derived int[erface] Gi1/0/2                  ! Show the derived interface configurations (useful when applying CoA)
Error Disabled ports
show int[erface] status err-disabled
Find a device
Show the ARP table (this is only the ARP table of the default VRF)
sh[ow] arp
Show the ARP entry for a specific IP
sh[ow] arp <ip address>
Show the ARP entry for a specific mac address
sh[ow] arp | i[nclude] <MAC address>
Show the ARP table for a specific VRF, other “filters” work like above
sh[ow] arp vrf <vrf name>
Show the MAC address table
sh[ow] mac address-table
Hardware
CPU
sh[ow] proc[esses] cpu sort[ed]
sh[ow] proc[esses] cpu history
Memory
sh[ow] memory sum[mary]
sh[ow] proc[esses] mem[ory] sort[ed]
Temperature
sh[ow] env[irnment] temp[erature] status
Power
sh[ow] env[ironment] pow[er]                              ! Shows the power supplies of the stack master
sh[ow] env[ironment] pow[er] all                          ! Shows the power supplies of all the stack members
sh[ow] env[ironment] pow[er] switch <stack member nr>     ! Shows the power supplies of a specific stack member
Licensing
Licensing information
sh[ow] license all
sh[ow] license sum[mary]
Add switch to smart account
conf t
 ip name-server <dns-server(s)>
 call-home
  http resolve-hostname ipv4-first
  contact-email-addr <contact email>
  profile CiscoTAC-1
   active
  exit
 exit
 ip http client source-interface vlan <management vlan>
 no license smart privacy hostname
 license smart transport callhome
 service call-home
end

license smart trust idtoken <token> all force
Change the bootlevel of the switch (to network-advantage with addon dna-advantage)
configure terminal
 license boot level network-advantage addon dna-advantage
end
PoE
PoE Port status
sh[ow] power inline
PoE port config auto
conf[igure] term[inal]
 int[erface] <interface>
  power inline auto
end
PoE port config static
conf[igure] term[inal]
 int[erface] <interface>
  power inline static
  power inline static max <4000-30000 (milli-watts)>
end
Activate PoE High Availability (keeps PoE enabled even when the switch is rebooting, as long as the switch has power)
conf[igure] term[inal]
 int[erface] <interface>
  power inline port perpetual-poe-ha
end
SFP
Switch Stack
Check stack
sh[ow] switch

! Expected result:
! * is stack master
! ---
! Switch/Stack Mac Address : 4aaa.bbbb.cccc - Local Mac Address
! Mac persistency wait time: Indefinite
!                                             H/W   Current
! Switch#   Role    Mac Address     Priority Version  State
! -------------------------------------------------------------------------------------
!  1       Standby  1aaa.bbbb.cccc     1      V01     Ready
!  2       Member   2aaa.bbbb.cccc     1      V01     Ready
!  3       Member   3aaa.bbbb.cccc     1      V01     Ready
! *4       Active   4aaa.bbbb.cccc     1      V01     Ready
Quick switchstack summary
sh[ow] switch detail

! Expected Results:
! ---
! Switch/Stack Mac Address : 4aaa.bbbb.cccc - Foreign Mac Address
! Mac persistency wait time: Indefinite
!                                              H/W   Current
! Switch#   Role    Mac Address     Priority Version  State
! -------------------------------------------------------------------------------------
!  1       Standby  1aaa.bbbb.cccc     1      V01     Ready
!  2       Member   2aaa.bbbb.cccc     1      V01     Ready
!  3       Active   3aaa.bbbb.cccc     1      V01     Ready
! *4       Member   4aaa.bbbb.cccc     1      V01     Ready
!
!
!
!          Stack Port Status             Neighbors
! Switch#  Port 1     Port 2           Port 1   Port 2
! --------------------------------------------------------
!   1         OK         OK               2        4
!   2         OK         OK               3        1
!   3         OK         OK               4        2
!   4         OK         OK               1        3
Stack-port neighbors on its own
sh[ow] switch ne[ighbor]

! Expected result:
! ---
!   Switch #    Port 1       Port 2
!   --------    ------       ------
!       1         2             4
!       2         3             1
!       3         4             2
!       4         1             3
More info about the stack-ports
sh[ow] switch stack-ports summary

! Expected result:
! ---
! Sw#/Port#  Port Status  Neighbor/Port  Cable Length   Link OK   Link Active   Sync OK   #Changes to LinkOK  In Loopback
! -------------------------------------------------------------------------------------------------------------------
! 1/1        OK           4/2            50cm           Yes       Yes           Yes       1                   No
! 1/2        OK           2/1            50cm           Yes       Yes           Yes       1                   No
! 2/1        OK           1/2            50cm           Yes       Yes           Yes       1                   No
! 2/2        OK           3/1            50cm           Yes       Yes           Yes       1                   No
! 3/1        OK           2/2            50cm           Yes       Yes           Yes       1                   No
! 3/2        OK           4/1            100cm          Yes       Yes           Yes       1                   No
! 4/1        OK           3/2            100cm          Yes       Yes           Yes       1                   No
! 4/2        OK           1/1            50cm           Yes       Yes           Yes       1                   No
Show stack version
sh[ow] version                                             ! Full version details
sh[ow] version | inc[lude] software|uptime|Last|INSTALL    ! Filter some useful info
Reboot a single stackmember
reload slot <stack member switch number>
Change switch member number from x to y
switch <x> renumber <y>
reload slot <x>

conf t
 no switch <x> provision
end

! After this, the ports from switch y (Gi<y>/0/1-48 and Te<y>/1/1-4) should be defaulted
Filesystem
Flash usage
show file systems
See files on specific file system (example flash-1:)
dir flash-1:                           ! Only shows files in that directory, not recursive
show flash-1:                          ! Recursively shows all files
Firmware upgrades
We do firmware upgrades from Cisco Catalyst Center now. This is a bit easier and better to plan the upgrade. But I do not want to lose the usefull commands used when manually upgrading the switchstacks. These commands assume the switchsstack is in install mode.
Check if switch is in install mode
show version | i INSTALL
Change the stack to INSTALL mode
configure terminal
 no boot system
 do show boot
 boot system flash:packages.conf
end
Upgrade procedure
Download the firmware image from software.cisco.com and note (by hovering your mouse over the filename):
- MD5 Checksum
- File Size
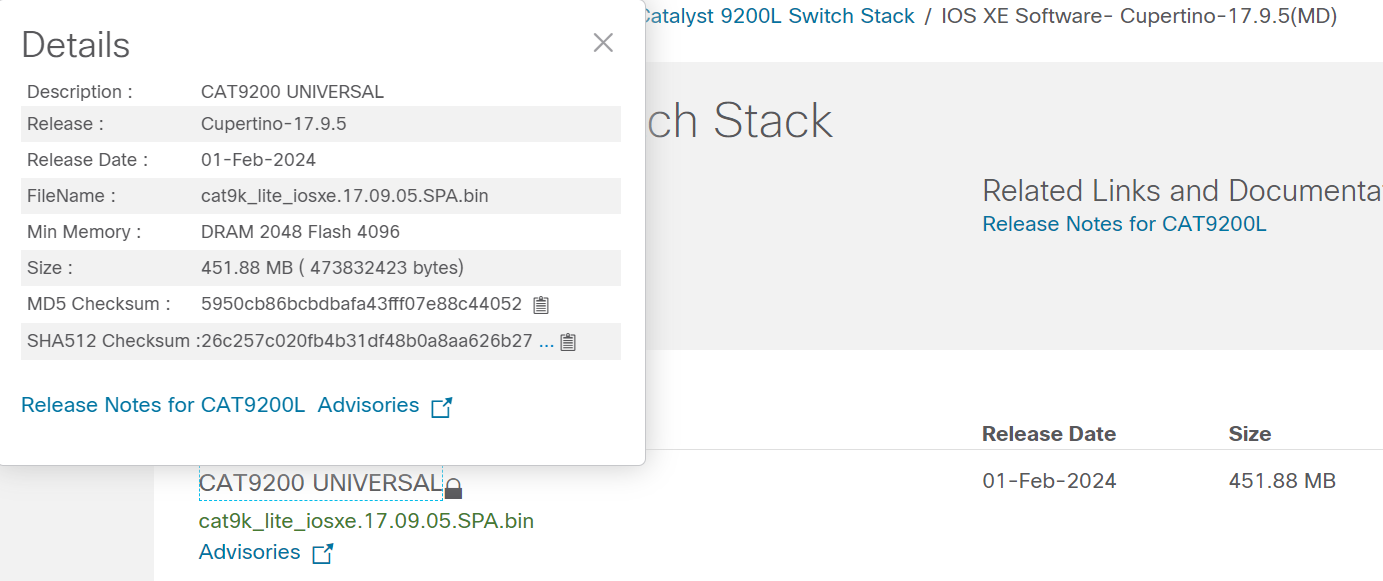
Check if there’s enough space on the switches. Compare the available space on the device to the filesize. If there isn’t enough space, try this command to remove unneeded files from previous firmware versions:
install remove inactive
Use FTP to download the firmware image (.bin file) to the switchstack.
copy ftp://<username>@<ftp-server>/<filename> flash:<filename>
Verify the image against its checksum
verify /md5 flash:<filename> <checksum>
The all in one install command:
install add file flash:<filename> activate commit
This command can also be split up to add activate and commit to do these steps seperately. But for ease of use the all in one is best. :)
This command also RELOADS the switchstack. For the 120 Cisco Catalyst 9200L-48P-4X switchstacks I upgraded, this reload took about 7 minutes. Before the reload the switch took between 10 - 15 minutes to add the file.
After the reload you can check if the installation was successful by running the command:
show install summary

! Expected Result:
! ---
! [ Switch 1 2 3 4 ] Installed Package(s) Information:
! State (St): I - Inactive, U - Activated & Uncommitted,
!             C - Activated & Committed, D - Deactivated & Uncommitted
! --------------------------------------------------------------------------------
! Type  St   Filename/Version
! --------------------------------------------------------------------------------
! IMG   C    17.15.05.0.8370
!
! --------------------------------------------------------------------------------
! Auto abort timer: inactive
! --------------------------------------------------------------------------------
The important part is that the state is C (Activated & Commited) and not U (Activated & Uncommited). If the state is U, the Auto abort timer also probably isn’t inactive. If the auto abort timer runs out and the firmware still isn’t commited, the switch will rollback to the previous version. If the commit isn’t done automatically, you should do it manually to prevent the rollback. You can do that by running the command:
install commit
Some “After care”
To remove the packages from the previous version and the .bin file run:
install remove inactive
To make sure switches get auto upgraded to the same firmware version when a new switch is added to the stack with another firmware version:
configure terminal
  software auto-upgrade
end
Just to be sure: copy running config to start config
write mem
copy run start
Cisco Catalyst Wireless Controller
WLC
Health Checks
show redundancy
show redundancy switchover history

show chassis
show chassis rmi

show processes cpu sorted
show processes cpu history

show memory
show processes memory
Redunancy
show redundancy
show redundancy switchover history
show chassis
show chassis rmi
Change primary node
redundancy force-switchover
Radio Active (RA) Traces
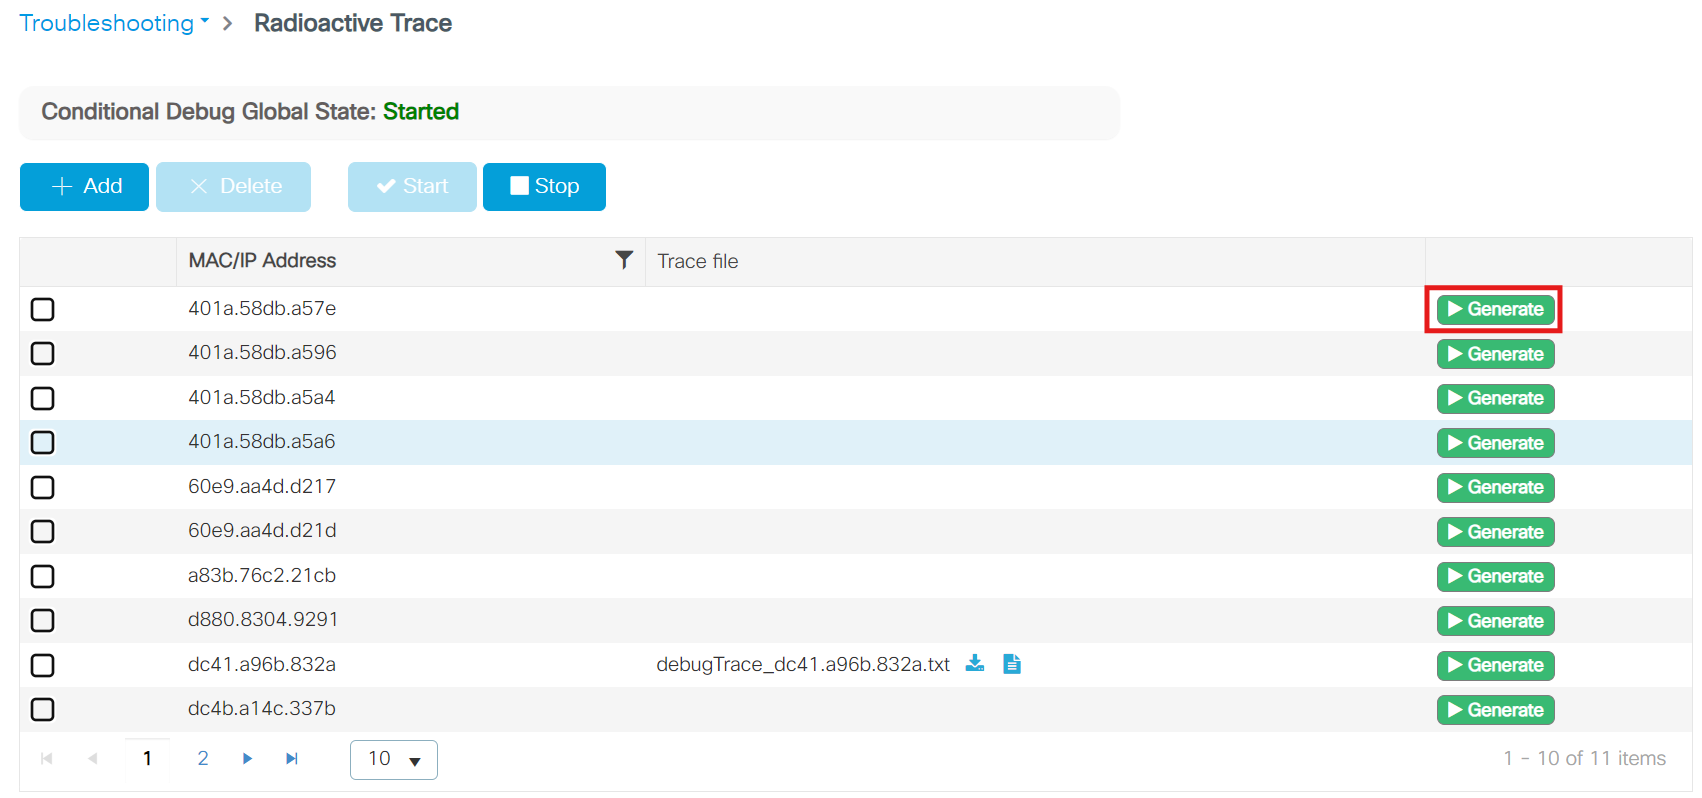
Go to Troubleshooting > Radioactive Trace
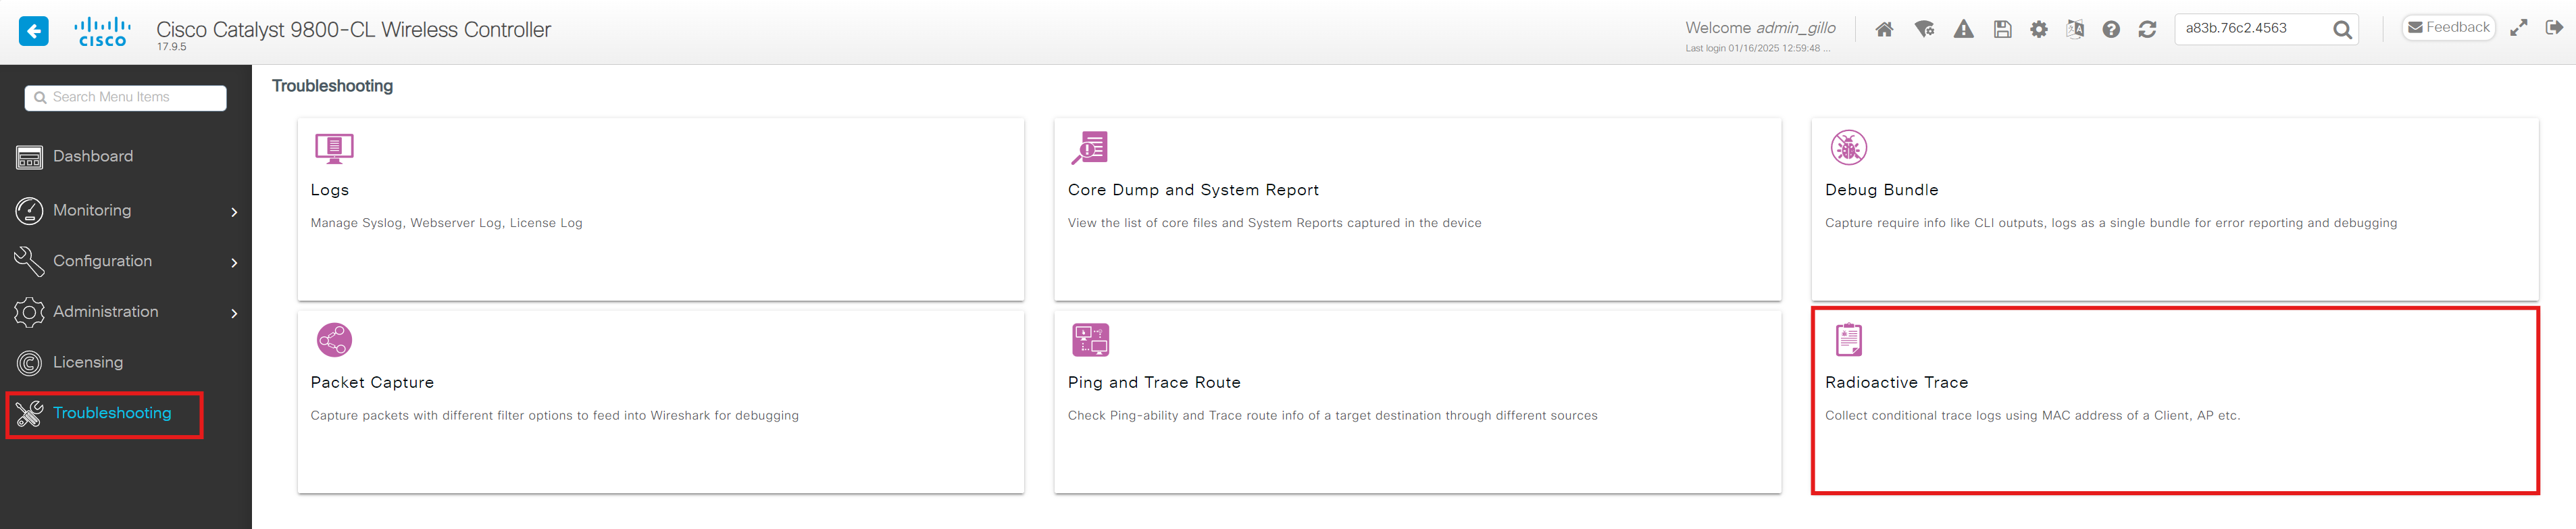
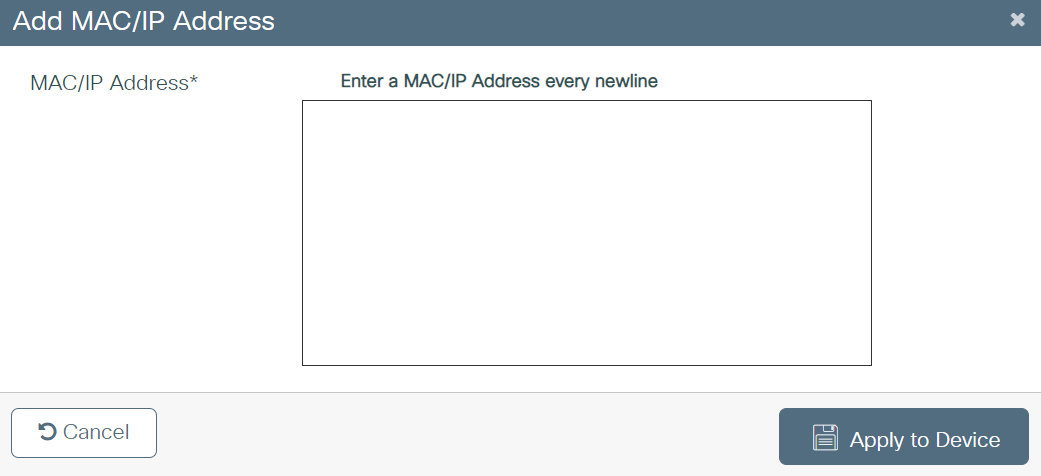
Click on Add and add every MAC address you need to monitor on a new line in the text field of the pop-up. Click on Apply to Device and then on the Start button on the top op the table.
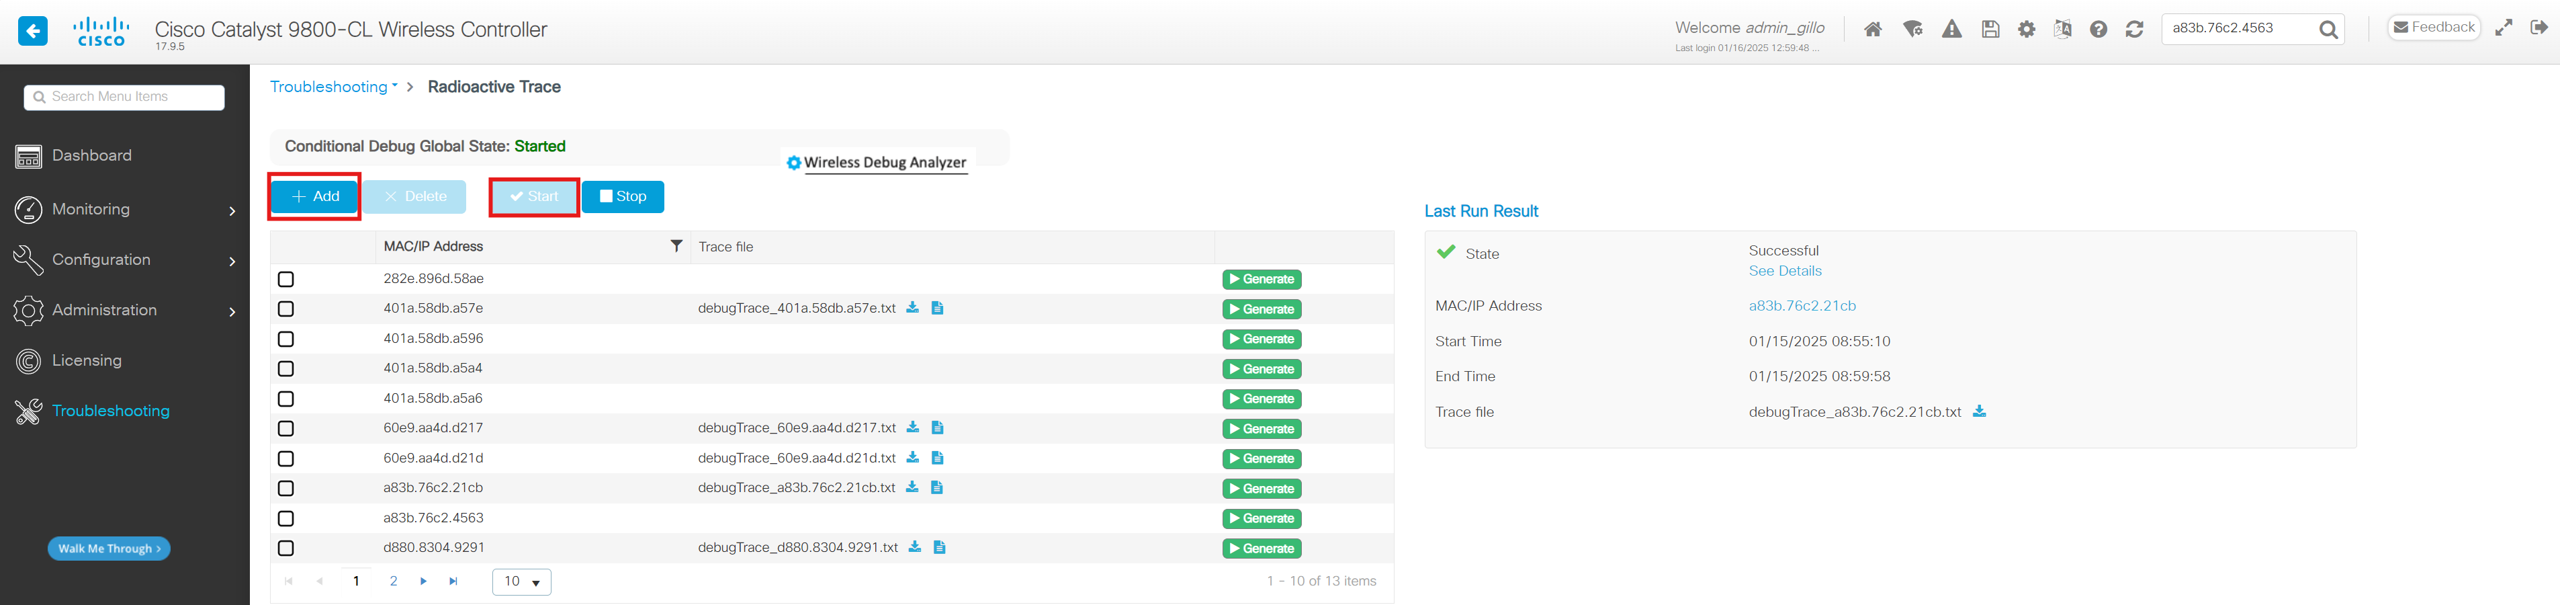
Generate RA (RadioActive) Traces report for a client
Go to Troubleshooting > Radioactive Trace, choose the MAC address of the client you need the report from. Click on Generate.
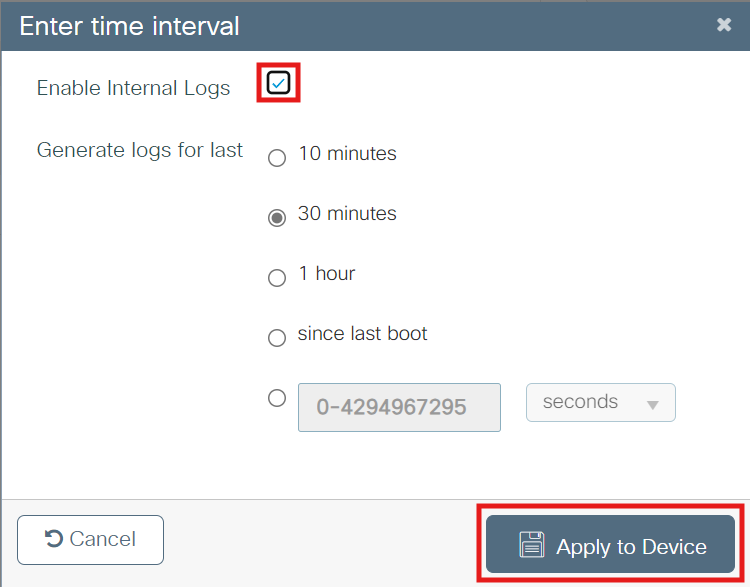
Check the Enable Internal Logs checkbox and choose the time period you need the report from. After that, click Apply to Device.
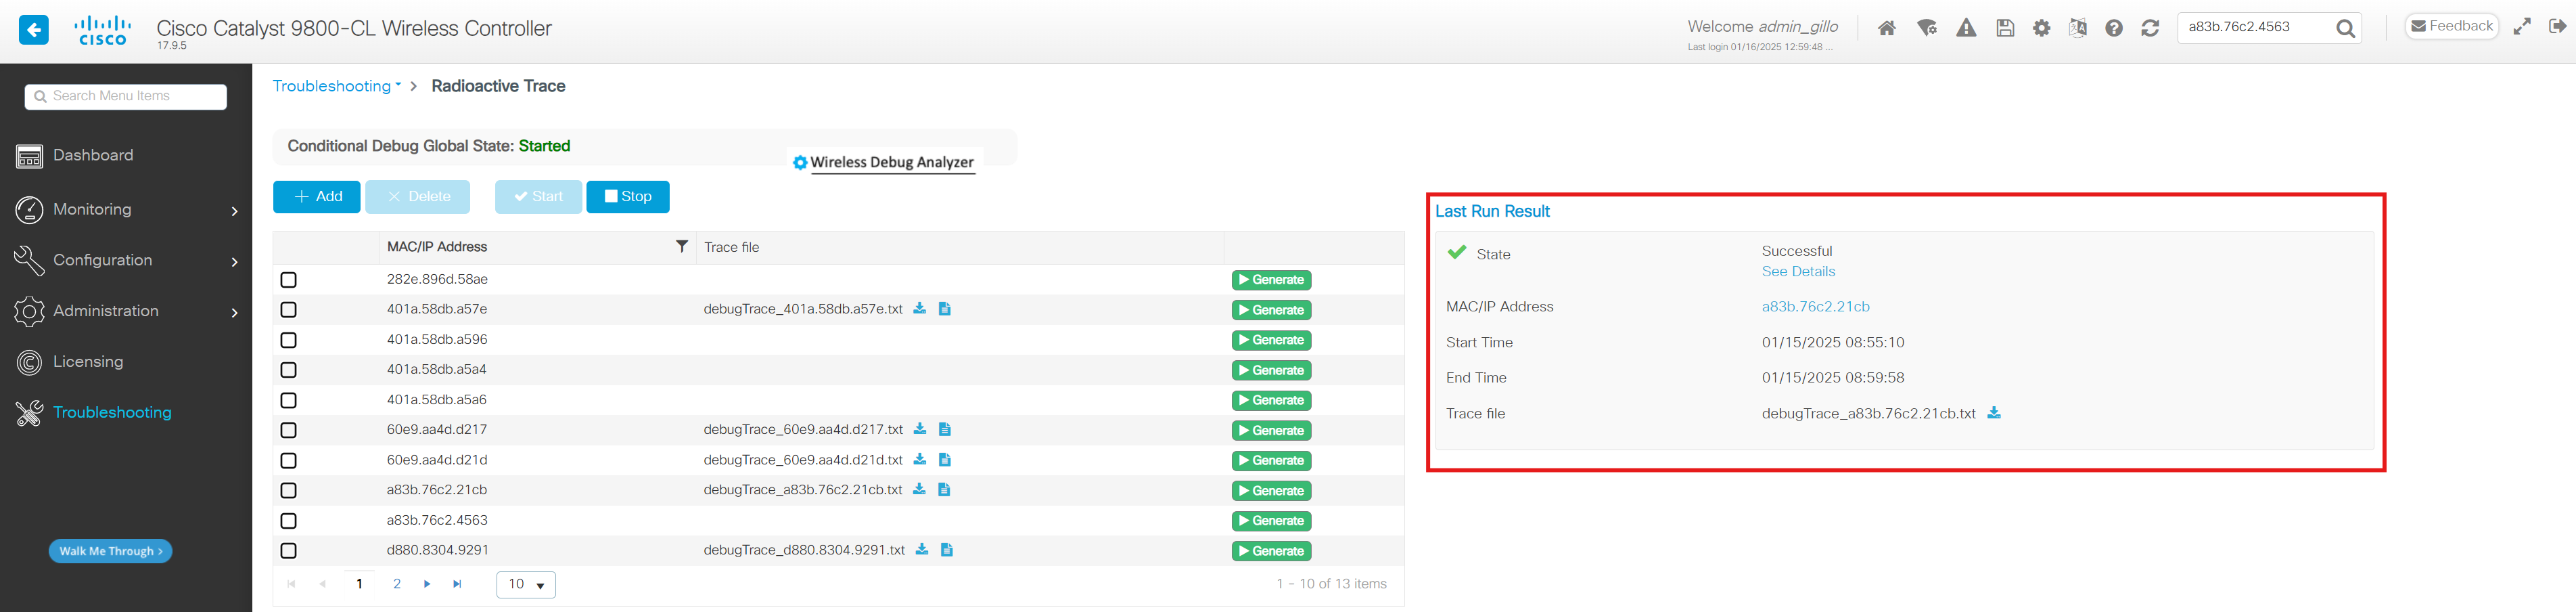
The logs are now being generated and you get some info on the right side of the table like you see in the screenshot underneath.
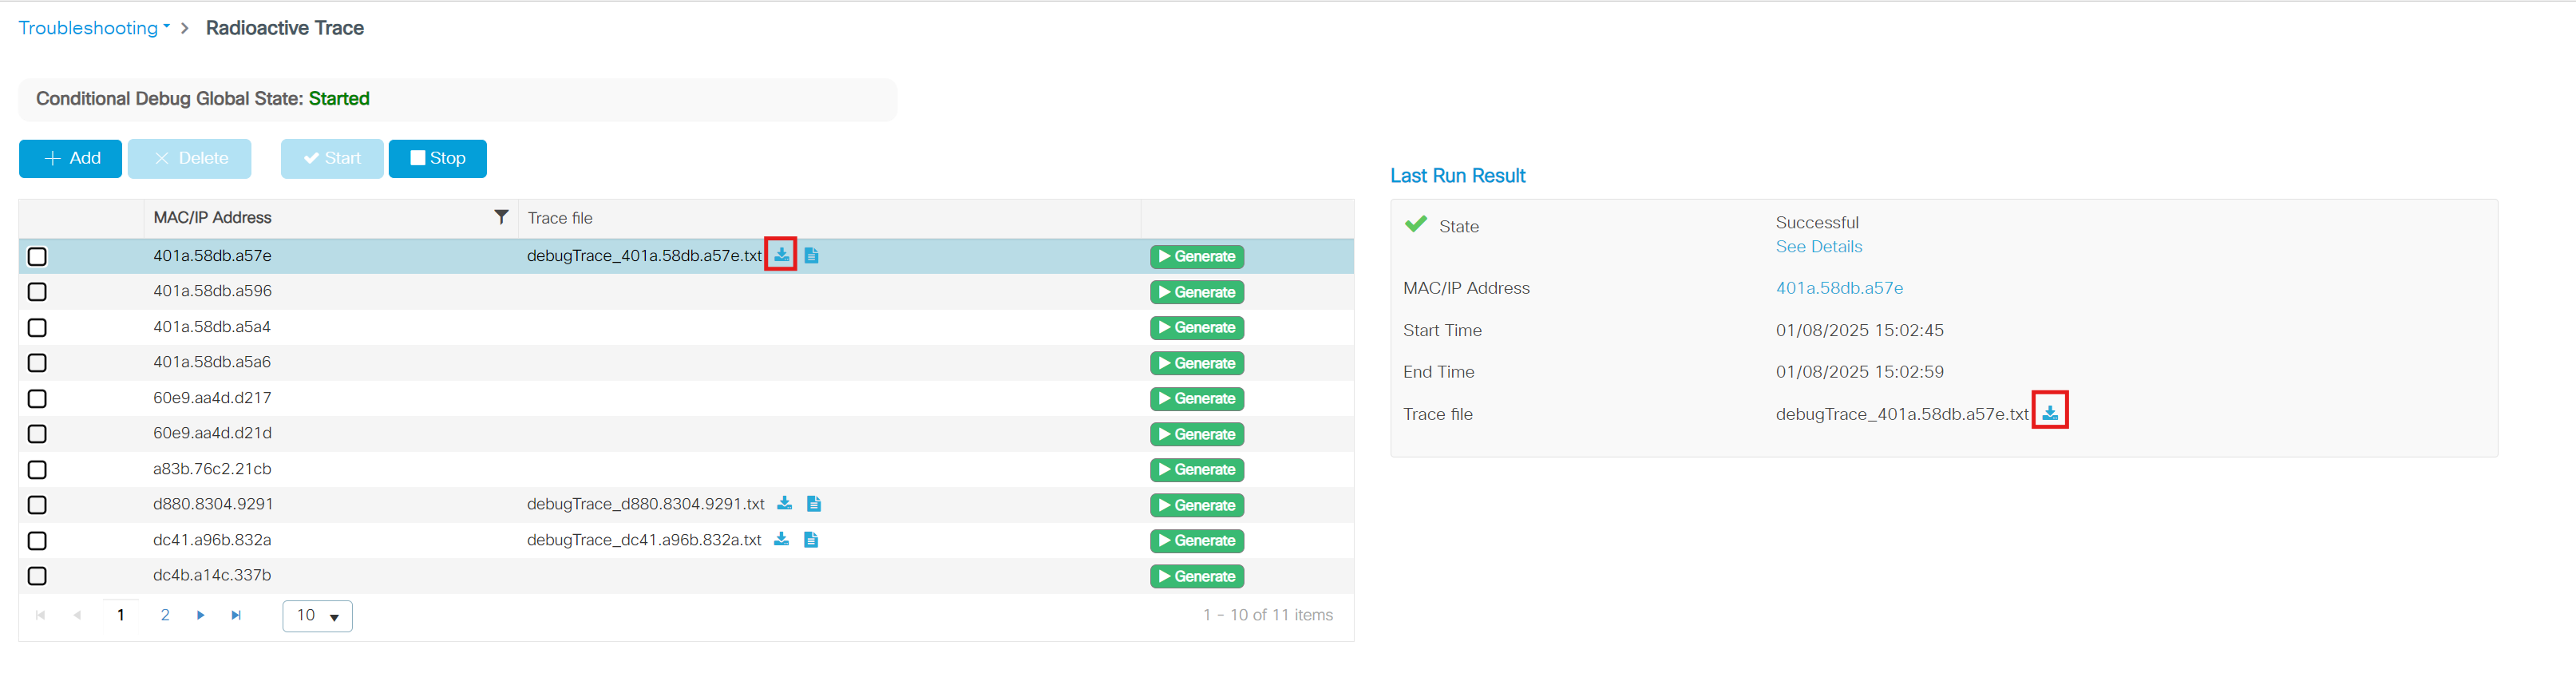
Download the RA (RadioActive) Traces
Click on the download icon next to the generated report filename.
Exclude Client MAC
CLI
conf t
 [no] wireless exclusionlist <MAC address> <description, max 32 characters>
end
GUI
Go to Monitoring > Wireless > Clients > Excluded Clients
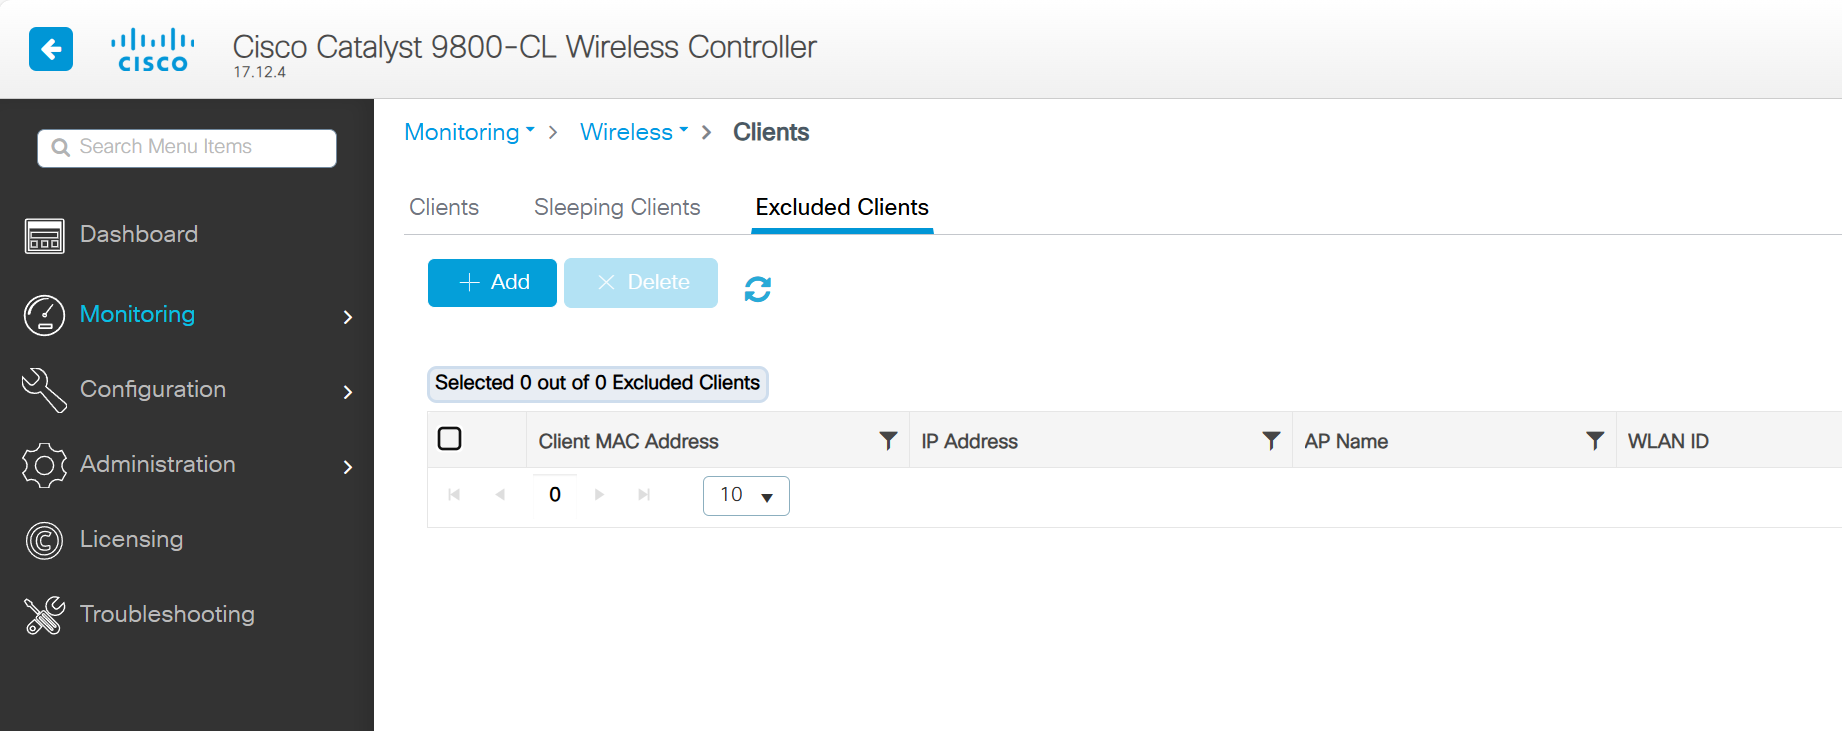
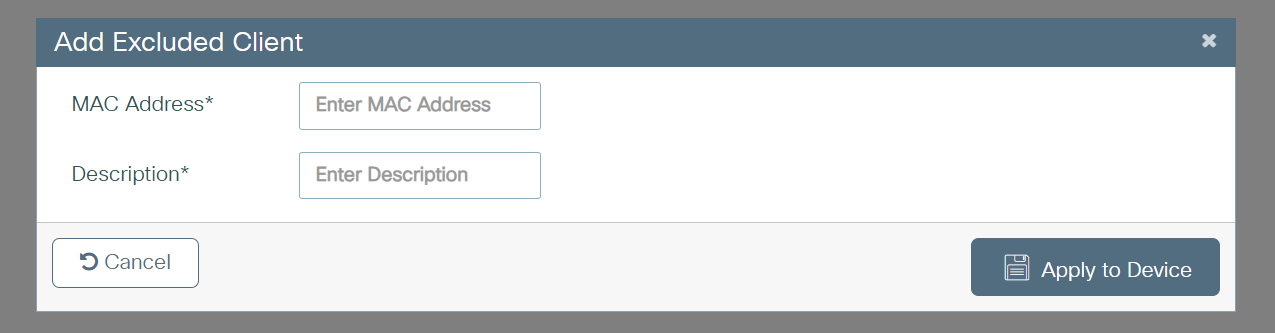
Click on Add and enter the MAC Address and Description. After that click Apply to Device
Access Points
AP config
CLI
show ap name <AP name> config general
GUI
Reboot AP
CLI
ap name <AP name> reset
GUI
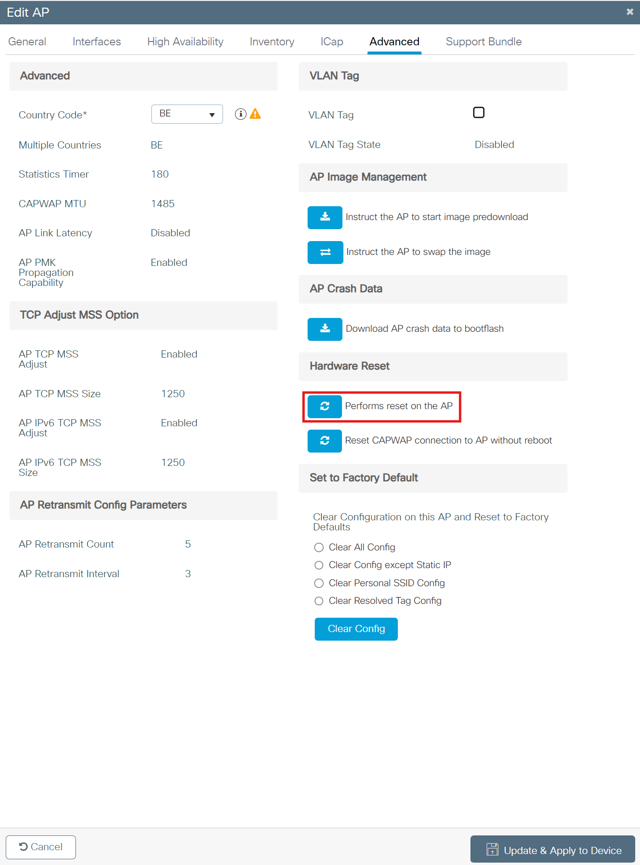
Go to Configuration > Wireless > Access Points > All Access Points and select the access point you want to reboot.
Click on Performs reset on the AP and Update & Apply to Device
Show AP tags
CLI
ap name <AP name> tag info
ap name <AP name> tag detail
GUI
Change AP tags
CLI
conf[igure] term[inal]
 ap <eth mac>
  policy-tag <policy-tag name>
  rf-tag <rf-tag name>
  site-tag <site-tag name>
end
GUI
Change AP primary controller
Only needed if you want to statically set the controller IP for an AP
CLI
ap name <AP name> controller primary <controller name> <controller IP>
ap name <AP name> reset                                                     ! AP needs to be restarted after changing primary controller
GUI
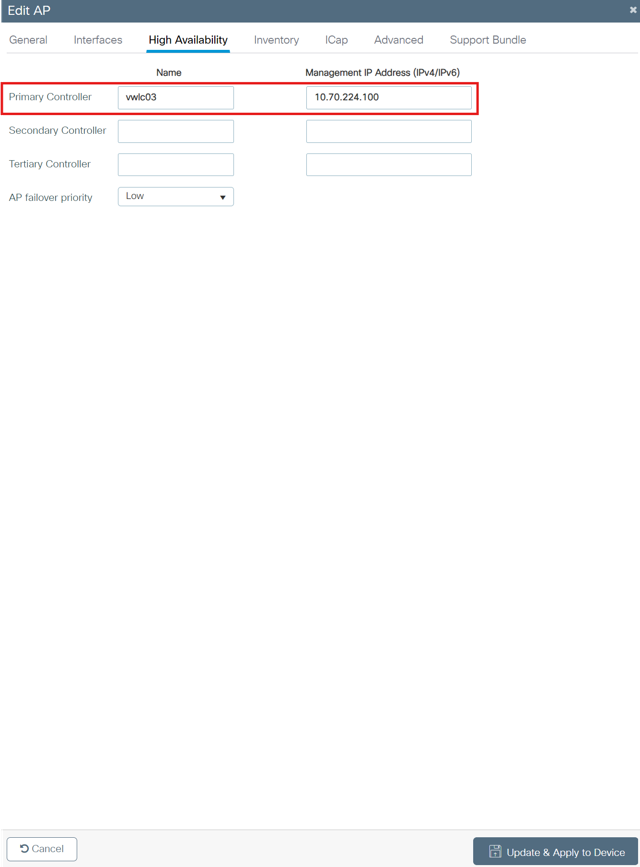
Go to Configuration > Wireless > Access Points > All Access Points and fill out the name and management IP for the new controller.
After that, click Update & Apply to Device and reboot the AP. (This setting only takes place after a reboot or the association timer ended with the current controller)
Change AP name
CLI
ap name <current AP name> name <new AP name>
GUI
AP LED
CLI
Show status
show ap name <AP name> config general | i LED
Change LED Status
ap name <AP name> [no] led
Flash LED
ap name <AP name> led flash start duration <seconds 0-3600>
ap name <AP name> led flash stop
Brightness LED
ap name <AP name> led-brightness-level <level 1-8>
GUI
Configure > Access Points > All Access Points Filter Hier op de AP naam die je wilt aanpassen.
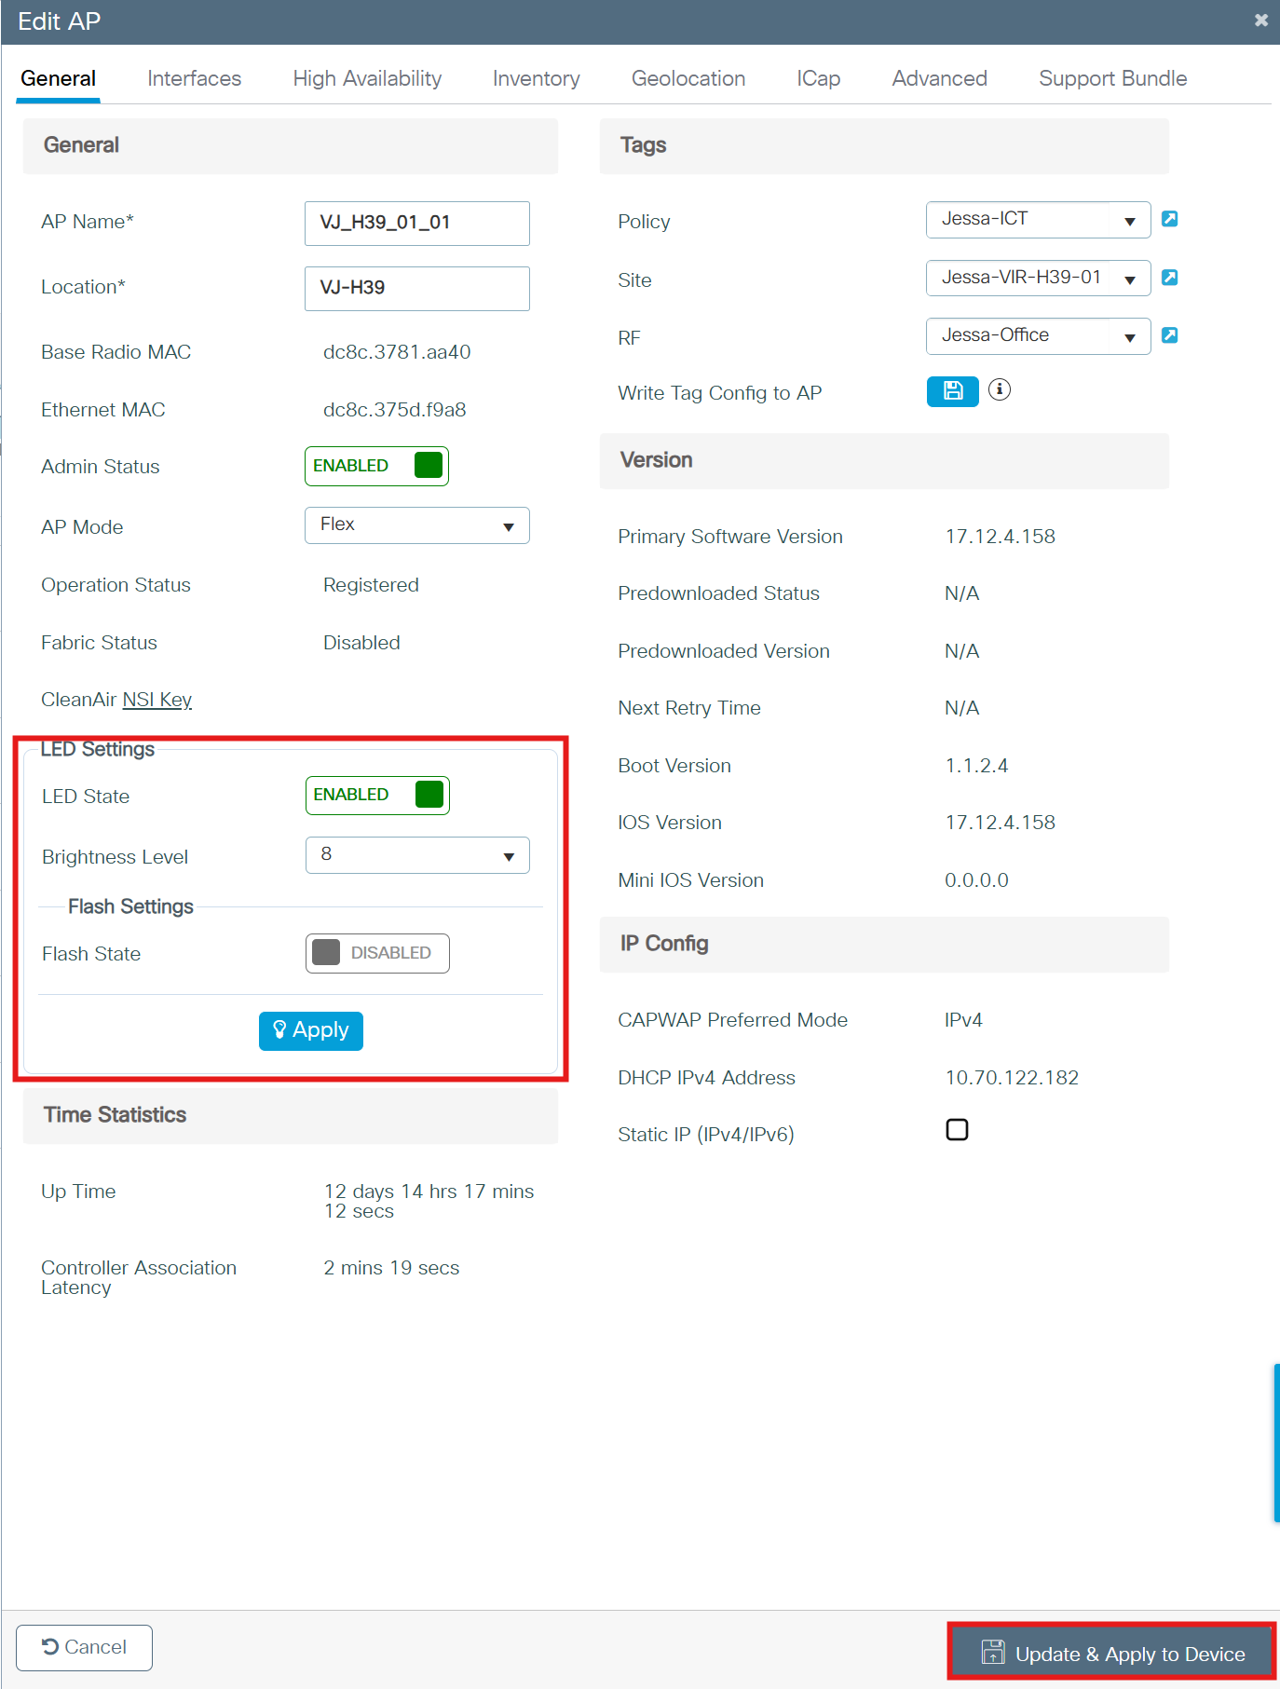
Show AP Image
CLI
show ap name <AP name> image
GUI
Show AP CDP neighbours
CLI
show ap name <AP name> cdp neighbors
GUI
RLAN
CLI
show ap name <AP name> lan port summary
GUI